Showing posts with label recipe. Show all posts

Recipe // Healthy Carrot and Applesauce Muffins

Check out the jewelry giveaway going on now! 

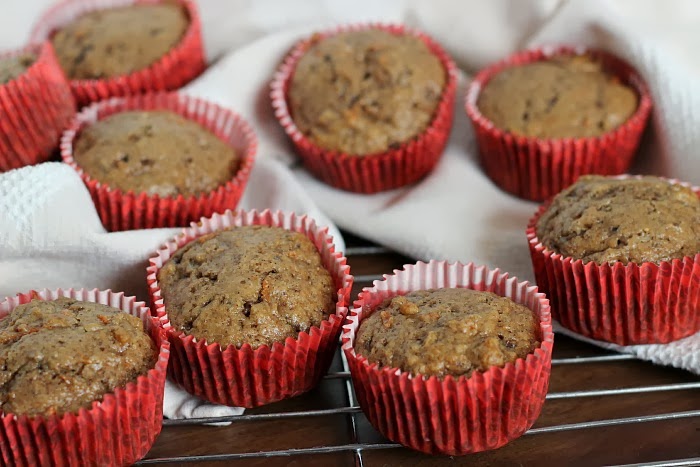
Today I am sharing another healthy muffin recipe with you. I just posted about the spinach and banana muffins, so don't miss out on that recipe. These carrot and applesauce muffins aren't as healthy as the spinach and banana but they still are just as good! These muffins reminded me of mini carrot cakes. You could definitely just say the hell with it about being healthy and top them off with some cream cheese frosting and make them 10x better. But if you want to be a bit nicer to your stomach, stick to the recipe. 

 Ingredients 

1 1/2 cups flour
1 tsp baking soda
1 tsp cinnamon
2 TBL melted butter
1/2 cup brown sugar
1 egg
1 tsp vanilla extract
1 cup applesauce (unsweetened or sweetened)
3/4 cup shredded carrots
1/3 cup chopped walnuts, pecans, or other nut

Directions 

1. In a bowl, stir together flour, baking soda, and cinnamon. In another bowl, beat together the butter, sugar, applesauce, egg, and vanilla. Stir in carrots and nuts.

2. Add wet ingredients to dry ingredients and fold the two mixtures until combined. Make sure to stop mixing once the dry ingredients are incorporated otherwise over mixing can make the muffins tough. We want fluffy and light muffins!

3. Grab your muffin tray and either spray it with cooking spray or line it with muffins tins. Fill each tin about 3/4 full. Throw in the oven at 350 degrees for about 18-20 minutes. Insert a toothpick in the middle of the muffin once they're done baking to make sure the middle is cooked.

Recipe // Healthy Spinach and Banana Muffins

Check out the jewelry giveaway going on now!!


I've been on a health kick recently and just trying to eat better, cut out as much sugar as possible, and just be overall healthy. I posted about my sugar addiction a while back and gave a couple sugar free recipes to try out. I wanted a few snacks around the house that would help with my sweet tooth but also be healthy. So I took an afternoon to bake up some healthy muffins that I could eat in the morning with my smoothie or have as a quick snack before bed.

I've been making smoothies like crazy and always put at least a handful of spinach in them. It blends right up and I can't taste it at all, yet I'm still getting all the health benefits of the spinach. I've never had an issue with spinach. I know some people can't stand it, they say it taste disgusting. If you ask me, I'd say spinach has no taste and put it on whatever. It's good for you! I put it in my smoothies, sandwiches, with my eggs, and now my muffins!

If you're one of those people that can't stand spinach I wouldn't recommend these muffins to you. My mom insists on trying everything I make in the kitchen even though I know she won't like any of it. My mother is a very picky eater, the pickest of the picky, but she still tries everything so I give her credit for that. She hates spinach so I wasn't expecting her to even look at these. But of course, she poked her head around the kitchen door and asked if she could try one. I bit into the muffin and without even chewing she spit it out. I rolled me eyes and just continued.

Now if you're like me and don't give a darn, try them! I think they are delicious and I love the fact that I putting something good into my body. So try them out!! 

Ingredients 

1 1/4 cup flour
1/3 cup + 2 TBL brown sugar
1 1/4 tsp baking powder
1/4 tsp baking soda
dash of salt
1 tsp cinnamon
2 TBL canola oil
1/2 cup milk
4 ounces fresh spinach (about the size of a handful)
1 banana
3 TBL peanut butter
1 tsp vanilla

Directions 

1. In a bowl stir together the flour, sugar, baking powder and soda, salt, and cinnamon. Set aside.

2. Grab your blender and blend together the canola oil, spinach, peanut butter, spinach, banana, milk, and vanilla. Mixing these in the blender will make it a lot easier for the spinach to be mixed together smoothly with the other ingredients. This mixture will also be extremely green!

3. Pour the spinach mixture in the dry ingredients and mix until combined. Make sure to not over mix otherwise you will get tough muffins.

4. Line a muffin tray with tins or spray with cooking spray. Fill tins about 2/3 full with batter. Throw in the oven at 350 degrees for about 18-20 minutes or until a toothpick inserted into the middle comes out clean. Makes about 13 muffins.

Can I haz one?


If you try these muffins out, please let me know what you think of them!

<3

my addiction.....to sugar

Guys, we have a problem. I'm addicted to sugar. Like I crave that wonderful sweet nectar of the gods almost everyday. I constantly want candy after every meal, when I'm bored, when I'm watching a movie, when I'm not watching a movie, even when I think about whether I want to watch or not. It's terrible!! And it's gotten worse! I blame my addiction on growing up and always having a dessert after your meal. That's how it always was. You ate your lunch, you got a cookie. You ate your whole dinner and you got a piece of cake. It's been carved into my brain that I must have something sweet to finish off whatever the hell I just ate.


I went to the dentist the other day for my 6 month cleaning and I had 3 cavities! That's 3 little sugar demons I have renting out my teeth and not paying rent. I haven't had 3 cavities since I was 3, probably, I don't really know, but it's been a long time. I was so angry with myself, because I brush my teeth twice a day and rinse with mouthwash! The only lie I ever tell them is that I floss everyday when in reality it's only after I eat popcorn. Now I have to get 3 fillings, all because I couldn't control myself with the damn candy bags.

This needs to stop. I haven't eaten any extra sugar for 4 days now and I feel like I'm going cold turkey off heroin, if I knew what that felt like. I went out and bought several packs of that Extra Dessert gum and it's been helping a little. I try to eat one every time I have a craving, so really a pack doesn't last that long. I'm trying to train my brain that it doesn't needs sweets after every meal. I read part of an article that says it takes at least 2 weeks for you to stop craving something. That's 2 weeks of dread for me. That's 2 weeks of looking like a caveman searching for food after every time I eat lunch! But I'm sticking to it. I will not let this addiction define me. My name is Kelly and I am recovering from a sugar addiction.

I wanted to share a few dessert recipes I've come across that have no refined sugar in them. I've been trying to switch to desserts that have less or no sugar in them and these next few recipes are to die for! So if your battling a sweet tooth like me, check these out.


My mom has been making banana bread for us since we were little. I love when the house fills up with the aroma and baking banana bread. I've made the recipe several times myself before so I know how much sugar goes 1 batch. I've cut out some sugar in the past to see if it would make a difference and I didn't taste any changes, so why not cut it out completely and throw blueberry in it? 


I haven't tried these yet, but I'm dying to. They look so fudgy and gooey and they have avocado in them, so you won't feel guilty after eating more than 1. 


These babies are not only sugar free, they are butter free and flour free. How the heck are these things made then you ask? With only 5 ingredients you would think these cookies are nasty and flavorless, but trust me, they are so good and so easy to make! Being a cookie girl like me, this is a nice alternative to the other cookies that my mother like to make with a few cups of sugar. 


<3

Recipe // Holiday Candies

 Merry after Christmas everyone! I hope you all had a wonderful and beautiful holiday and were able to spend some quality time with those loved ones. I have an exciting post coming up where I'm going to show you a special something I got for Christmas, but today I'm sharing with you one of my favorite holiday treats. These little goodies are so addicting and sometimes difficult to pry your hands away from. Christmas may be over and done with, but you can stay in the holiday spirit with these or even make them for a New Years bash. Or just make them for yourself as a after Christmas present to you.


I partnered with Tiny Prints to bring you this deliciously inspired recipe today. After being contacted with Tiny Prints I began to notice their cards everywhere. While at my family Christmas, I swear my Grandma had over 10 cards that were printed from Tiny Prints. They have beautiful holiday cards that can be personalized to your liking and trust me, you can get very creative with these cards. Tiny Prints has so many cards to choose from and not just holiday cards.... I'm ordering my birthday cards the second I'm done writing this post.

Enjoy the sweets my lovely bloggers 
<3

(disclosure: Tiny Prints provided me with greeting cards for this post) 

Recipe // Caramel Apples


I wanted to share these caramel apples I made a couple weekends ago. My wonderful step mother sent me a surprise gift that was a whole caramel apple kit. It came with a bag of caramels, bags of toppings, skewers, and six perfectly packaged apples. I almost died, the package was so cute. I made them straight away the next day because I was just too excited to wait. As always the caramel and toppings all fell to the bottom, I don't know why I have this problem every time I make caramel apples. Any tips for preventing that? 

The recipe to these apples is pretty simple. Melt your caramels, dunk your apples, throw your favorite topping at them and done. In the box, I was given m&ms, nuts, and sprinkles which I ended up using all three. I've also been the only one to eat these apples since I made them. I have one left. Well, they always say, an apple a day keeps the doctor away. I'm not sure how the doc feels if the apple is covered in caramel and sprinkle though... 


Check out my caramel apples I made last year here, with three different ways to make them!

And thank you to Jenni for gifting me this amazing gift! It made my Halloween 1000x better. :)

<3

Recipe // Dark Pumpkin Hot Chocolate


What a mess that drink looks like right? Well it's a delicious mess and I will be making this over and over during the winter season. It is the richest and the creamiest hot chocolate drink I have ever had. I really wanted to share to all you dark chocolate lovers, so enjoy!

Ingredients
2 c almond milk (or preferred milk)
1/4 c pumpkin puree
1 tsp ground cinnamon
1/4 tsp nutmeg
1/4 tsp ground ginger
1/8 tsp ground cloves
3 TBL unsweetened cocoa
dash of vanilla
marshmallows and chocolate syrup for topping

1. On the stove in a saucepan, whisk together milk, puree, cocoa, and spices. Heat over medium heat and heat just until its about to boil.

2. Remove from heat, add a dash of vanilla and top off with marshmallows and chocolate syrup. Serve immediately.

Just a quick tip, if you have pumpkin pie spice in your spice cupboard, use 3/4 tsp of that instead of adding all the individual spices. I just didn't have any pumpkin pie spice, so I used what it was made off. Also, add more or less cocoa powder to your liking. With 3 tablespoons, it makes the drink quite a dark chocolaty flavor, which I didn't mind.


<3

Recipe // Individual Apple Pies


I made these cute little mini pies this past Friday and was so happy with how they turned out. They're the perfect portion and can be eaten on the go. How great is that!? Since it was my first time trying out mini pies, it took me a couple batches to tweak them to perfection, but the last couple of batches came out great. 

I would definitely recommend using the egg wash on top of the pies to give them that great shiny brown top. Compared to the pies who didn't get it, there was a big difference in a appearance. No difference in taste, so don't worry about that if you don't care to do the egg wash, it's mainly for looks. These little guys are perfect to give as gifts to. Just wrap up in some bags and tie with a ribbon and you got a super easy gift that no one will be able to turn down. 

Ingredients and Directions

Crust:

2 cups flour
1 cup lard (Crisco)
1/2 tsp salt
1/2 tsp baking powder
1 egg + 2 tsp vinegar + water

Mix together dry ingredients. Cut the lard into the flour mix until crumbly mixture forms. Break egg into a measuring cup and add vinegar. Fill to 1/2 cup with water and mix. Add to flour and mix until a dough forms. The dough will be a bit sticky, use extra flour to handle. Form into a ball and set aside. 

Apple Filling:

A handful of apple slices (i didn't measure!) Macintosh apples work best
1/4 cup sugar
1/8 tsp cinnamon
1/4 tsp nutmeg
1/8 tsp cloves

Toss apples in the spices until fully coated. Set aside. 

Assembly:

1. Roll out pie crust evenly and relatively thin. Use a circle cookie cutter to cut out shapes, set aside access pie crust for next batch. 

2. Place several apple slices (or however many fit in the middle without overloading) in the middle of the crust. Use an egg wash and brush along the outer rim to act as glue. Place a second circle on top and use a fork to secure down the sides. Cut a x in the middle, brush with egg wash, and sprinkle with sugar. (the egg wash on top of the crust will create a really nice shiny brown finish on the pies. It's certainly not necessary)

3. Bake in the oven at 350 degrees for 25-30 minutes or until edges have browned and the middles are oozy. 

4. Repeat until all dough and apples are used up. I ran out of dough first and just ate the left over apples as is. :) 


<3

Recipe // Pumpkin Pancakes with Toasted Pecan Topping

It's Fall. I had to make something pumpkin flavored or the season just wouldn't have been the same. I've been craving pumpkin flavored pancakes for week and I never even had them before. How does that work? So one night I did some food gawking and put together a recipe for these amazing pancakes. I used a basic pancake recipe and just added some spices and of course pumpkin puree. They turned out pretty damn good, if I don't say so myself. Just take a look...


Pumpkin Pancakes 

Ingredients:
1 1/4 cups flour
2 TBL brown sugar
2 tsp baking powder
1/4 tsp salt
3/4 tsp cinnamon
dash of ginger
1 cup almond milk (or regular milk)
1/2 cup pumpkin puree
1 egg
2 TBL melted butter
1/4 cup toasted pecans
Maple syrup and butter for topping

Directions:

1. In a bowl, mix together dry ingredients. In another bowl, mix wet ingredients. Put wet into dry and whisk together until batter forms. Don't overmix! A few lumps is perfectly fine.

2. Heat up your skillet or frying pan and add some butter to prevent sticking or just use some cooking spray. Take a 1/4 scoop to scoop the batter onto the skillet. Helpful Tip: I found that the batter was a bit thicker then normal pancake batters. When I scooped the batter onto the skillet I used the scoop to spread out the batter into a larger circle to make the pancake thinner and also so that it would cook more evenly. Make sense?

3. Let pancake cook until small bubbles form on top and then flip to the other side and let cook all the way. During the same time of cooking the pancakes, I popped some pecans onto the skillet to toast them up a bit. Transfer pancakes to a wire rack or keep them in the stove to keep warm until ready to eat.

4. Serve with maple syrup and warm toasted pecans. So good.


Recipe // Cinnamon Toast Crunch Popsicles


Cinnamon Toast Crunch Popsicles

Ingredients needed:
2 cups milk
1 can condensed milk
1/2 cup fresh lemon juice
some lemon pulp
dash of cinnamon

In a blender, combine all ingredients and blend until smooth. Pour into popsicle molds and set in freezer for about 30 minutes. After 30 minutes, stick in popsicle sticks and let popsicles freeze thoroughly. When ready to serve, sprinkle with some more cinnamon and enjoy!

Chris came up with the name for these popsicles, because even though he didn't like them 100% he said they tasted like cinnamon toast crunch. I saw that the mixture separated while freezing (which you can kind of see in the pictures). I'm not sure why that happened, but I didn't taste any flavor differences so I wouldn't worry about it if it happens to you.

I hope you guys have been enjoying these popsicle recipes this month. I have 2 more coming soon!!


<3

Recipe // Summer Peach Cobbler with Molasses Cookie Crumble


Summer Peach Cobbler

Ingredients needed:

peach filling
6-8 sliced peaches
3/4 cups sugar
1 Tbl cinnamon

topping
15 Molasses cookies
1 cup flour
1/3 cup brown sugar
1/8 tsp ground ginger
1/2 cup melted butter

1. Peel and slice your peaches and fill the bottom of a 8x8in glass baking dish. Sprinkle the sugar and cinnamon over top the peaches. Feel free to mix everything together or just leave it sit there, no biggy.

2. Put the molasses cookies in a ziplock bag and smash the cookies with a rolling pin until you have a nice crumble with some good chunks still in there. Sprinkle the cookies over the peaches and make sure to cover the peaches layer.

3. In a mixing bowl, combine flour, brown sugar, ginger, and butter. Begin mixing the ingredients until a crumble begins to form. Take this mixture and sprinkle it over the cookies creating the last layer.

4. Thrown in the oven at 375 degrees for 40-50 minutes. At the last 10 minutes, cover the dish with tin foil to prevent the crumble from burning.


<3

Recipe // Tropical Island Pops


Tropical Island Pops

Ingredients needed:
1/2 pinapple
2 mangos
2 cups raspberries
5 kiwis
3 Tbl honey

1. Chop up all your fruit into small chunks to make it easier for the blender to puree.
2. You can layer these however you like. I started with kiwi, so I pureed those in the blender first with 1 Tbl honey. Pour into popsicle molds or little paper cups like I did with these ones. Set in freezer for about 10 minutes.
3. Repeat the same process with the second layer, by combining the mango, pineapple and 1 Tbl honey.
4. Repeat again with raspberries and 1 Tbl honey. If you're using paper cups, let the molds sit for about 20 minutes before sticking the popsicle sticks in.


<3

Recipe // Raspberry Lemonade Yogurt Pops


Raspberry Lemonade Yogurt Pops

Ingredients needed:
1/4 c sugar and extra
1 TBL lemon zest
1/2 c fresh lemon juice
1 1/2 c plain yogurt
6 oz raspberries

1. In blender, combine raspberries and a pinch of sugar. Blend until smooth. Pour into molds and set in freezer. 

2. In blender, add lemon zest and sugar. Give a quick mix and then add lemon juice and yogurt and stir until smooth. Pour into molds, on top of raspberry mixture and set in freezer. All done! 

See? I told you I would have more popsicle recipes coming this month. This is only the beginning. This recipe wasn't didn't turn out to be my favorite out of all the others but it is still delicious. I think next time I would swirl the two layers together to have a mixture of flavors. Always looking for improvement! Enjoy it! 


<3

Recipe // Raspberry Banana Popsicles


Happy August everyone! First off, I have been pathetic with blogging this summer. Besides my vacation in Florida, I haven't really done anything to blog about and really I just haven't felt like blogging at all. But this month I am redeeming myself and I am quite excited about it. I may have not blog really at all in July, but I have been planning for blogging in August.

This whole month I'll be posting homemade popsicle recipes! I've been mixing and combining new flavors and tweaking some found recipes to make the ones I bring you this month. And let me tell ya, they have turned out to be quite delicious. 

Wisconsin has had one miserable summer lately. It's just about to be August and I'm pretty sure the temperature hasn't gotten passed 70 degrees where I am. It's also down in the 40's some night. I think the state is just a little ahead of it's fall schedule. But anywho, I've decided to ignore and try and enjoy my summer and what's left of it. 

Alright, let's get into the recipe...


Raspberry Banana Popsicles

Ingredients needed:

3 TBL sugar
2 TBL lemon juice
1 tsp vanilla
1 cup plain yogurt
Raspberries
Bananas
Popsicle molds (found mine at TJMaxx for $6)

1. Combine raspberries, 2 TBL of sugar and lemon juice in blender. Fill molds 1/3 full with mixture. Set in freezer. Set aside remaining mixture. Wash out Blender.

2. Combine bananas, yogurt, 1 TBL sugar and vanilla in blender. Remove molds from freezer and fill with banana mixture another 1/3. Set in freezer and fill to the top with remaining strawberry mixture.

3. Eat.

These popsicles turned out so good (I'll probably say that about all the recipes, just an fyi). If your not a fan of the solid flavors, fill the molds without freezing the individual layers and then take a toothpick or popsicle stick to help swirl the flavors together. I wish I had done that to taste the difference, but they were ahhmazing either way.
<3

Recipe // Banana and Chocolate Chip Cupcakes with Creamy Chocolate Frosting


Hello there and happy Saturday morning. Last night while Chris was at work I was baking up a new cupcake recipe and let me tell you, O M G. There cupcakes turned out so good and scrumptious, I can't stop eating them. I used a yellow cake box mix for this recipe instead of making them from scratch like usual, mainly because it was faster and easier. But if you are against that, go right ahead and use a from scratch recipe. They even work as a quick breakfast, minus the frosting. The banana and chocolate chips make it almost like a muffin, then you ad the frosting and BAM it's dessert. Definitely a recipe to try out!

Banana and Chocolate Chip Cupcakes with Creamy Chocolate Frosting

1 box yellow cake mix
2-3 bananas, mashed
1/2 cup water
1/4 cup butter, softened
3 eggs
1 bag mini chocolate chips
1 1/2 TBL flour
1 box banana runt cadies

In a large bowl, mix together cake mix, bananas, water, butter and eggs until smooth. Add chocolate chips and flour until combined into batter. Divide batter into cupcake tins and bake at 325 degrees for 18-22 minutes.

Creamy Chocolate Frosting

1/2 cup butter, softened
3 oz unsweetened baking chocolate
3 cups powdered sugar
2 tsp vanilla
3-4 TBL milk

In a small pot, melt baking chocolate over low heat. Let cool and then mix with butter until smooth. Add powdered sugar 1 cup at a time. Add vanilla and milk and mix until the frosting becomes creamy. If the frosting gets to thick, add more milk. If it gets to thin, add more powdered sugar.


Recipe // Marshmallow Fondant

I wanted to show you guys how to make the easiest fondant recipe and when I say easy I mean, it's the easiest thing ever! I don't normally cover cakes that I make in fondant because it was always a hassle to make, roll out, and hope like hell it doesn't split the second you lay it over your cake. However with this marshmallow fondant recipe, I might just start using it for cakes more often. It's the tastiest fondant I've ever had and the easiest to work with.

Ingredients needed:
1 16 ounce bag mini marshmellows
1 tsp vanilla
1 Tbl melted butter
1 2lb bag powdered sugar

Melt your marshmallows over the stove, stirring occasionally until melted all the through. Or for a quick melt, nuke um in the microwave. Use a wooden spoon that has been sprayed with Pam or butter to scoop the mallow fluff out of the pot and into a large bowl. Add vanilla and butter and give it a good stir. Start adding the powdered sugar, 1 cup at a time, until it begins to form a solid ball (about half way through, it's easier to just start using your hands).Cover a surface in powdered sugar and take your ball out. Begin kneading the dough for about 5 minutes, adding more powdered sugar if sticky. 

Wrap in plastic and store in your fridge for a few hours or over night for next day use. Otherwise, wrap in plastic in a freezer storage bag and store in the freezer up to a few months. When ready to use, take out and let it come back to room temperature. 


<3

Recipe // Easter Bunny Cupcakes (Happy Easter!!)


Happy Easter everyone! I hope you'll having a great day and eating lots of food. Usually I just do simple posts for holidays, but today I actually wanted to give you all a little something. Yesterday was a very rainy day, which means there will always be something baking in my house. On this occasion, it was Easter bunny cupcakes. I got my inspiration from this Taste of Home recipe I found while working. I brought it up to my momma dear and of course she helped out in creating them (mostly all of it). We didn't follow the recipe very precisely, but I loved how they turned out! 

 These little bunnies are cuteness overload! Enjoy :)

Ingredients

Cupcakes:
-spice cake box mix
-eggs
-water
-vegetable oil

Frosting:
-8 oz cream cheese 
-1 bag powdered sugar 
-4 Tbl butter, softened
-splash of milk (add as needed)

Cookie Ears:
-1 package sugar cookie mix

Face:
-Black icing gel
-Pink and red jelly beans

1. Make cupcakes according to the package and fill up your tins. Bake at 350 degrees for 18-23 minutes. When done, set aside and let cool. 

2. Time for frosting! In a bowl, beat together cream cheese, butter, and milk. Gradually add in powdered sugar until creamy and smooth. If you add to much sugar splash some more milk in there and it'll pop right back to normal. Frost cupcakes and set aside....again.

3. Make cookies according to package. My mom actually made the cookies from scratch, but to make this recipe even easier, use the tube stuff. Roll out and cut out bunny shaped ears. If you have a bunny cookie cutter, yay you! If not, it's not that difficult, no worries! Bake, set aside and let cool. Once cooled, stick the ears into the cupcakes. 

4. Make your face! You can do this anyway you like. We went through a few different looks before deciding on this one. It's all up to you! 


<3
© hello, it's kelly
Design:Maira Gall.